Wednesday, September 17, 2014

Ricotta Biscuits

Yum
As with many recipes posted here, this one for Ricotta Biscuits came out of the desire to make something before something in the refrigerator went bad. This time around it was half a container of ricotta cheese that remained after attempting to cobble together a lasagna from other leftovers. I didn’t want to make another lasagna, so it was between a quiche and something cookie-like. Cookies are better for snacking on, so the hunt was on for a cookie recipe that incorporated ricotta cheese. I found several recipes that sounded heavenly, so tried to mix a few, and the result was something more akin to tea biscuits or scones. They still made wonderful bite-sized snacks (it was quite easy to scarf down three or four of them without even thinking), so the mission was still accomplished!


Ingredients
1 cup butter (or ¼ cup applesauce, ¾ cup canola oil)
1 cup granulated sugar
1 cup brown sugar
2 eggs
16 oz. ricotta cheese (I had low-fat on hand)
2 TSP vanilla extract
2 cups all-purpose flour
2 cups fine-ground whole wheat flour
1 TSP baking powder
1 TSP baking soda 

Preheat the oven to 350°F and grease a cookie sheet. In a large bowl, cream together the butter and sugar. Beat in the eggs one at a time. Stir in ricotta cheese and vanilla. In a separate bowl, combine the dry ingredients, then stir into the wet mixture. Drop by rounded spoonfuls onto the cookie sheet. Bake 8-10 minutes until the edges start to brown.
 

~Karla

Monday, June 23, 2014

Varenyky (Ukrainian boiled dumplings)

Yum


Every culture has some recipes for comfort foods that not only warm your stomach, but also warm your heart. Even though there is a vast variety in these foods, there are also similarities between the comfort foods in different cultures. Soups and stews are some of the best examples. Another common theme in comfort food around the world would be dumplings. Whether it is the Italian ravioli, Japanese gyoza or the Nepali momo, a warm plate of these soft filled pillows of dough makes for a wonderful meal.

Several Eastern European countries make similar types of dumplings with each one having their own twist on it. Varenyky (pronounced: va-re-ni-ki) are boiled Ukrainian dumplings. They can be made sweet or savory, with the most traditional fillings being cherry, farmers’ cheese, mashed potato, mushrooms or cabbage. The recipe I have here is for a mushroom and potato filling, but the same dough and procedure can be used for making varenyky with any other filling. After playing with the dough recipe for a little while and not being too satisfied with it, I asked my friend Maria for her traditional recipe used at home. She was kind enough to share the recipe with me and to let me share it with you all on the blog.

Making varenyky can take up some time, but there is something very therapeutic about the whole process from making the dough to filling and sealing each dumpling. It also makes for a good weekend afternoon project and once you’ve made a big batch, they can be frozen to enjoy at a later time!

Ingredients:
Dough:
1.5-2 cups flour (Start with 1.5. Add more if the dough is too soft before rolling)
1.5 tbsp oil
¾ cup warm water
Pinch of salt
Flour for dusting the rolling surface

Filling:
2 large potatoes
1 cup finely chopped mushrooms
Oil for frying mushrooms
Salt
Pepper

Cooking:
Water
Salt

Topping:
~3/4 cup chopped onion
~2 tbsp oil
~2 tsp flour
Sour cream
Chopped parsley/spring onions

To make the dough, mix the flour and salt. In a separate bowl/cup, mix the water and oil. Stir a little and add to the flour. Mix well. Knead for a few minutes. Cover with a towel and let the dough rest for about an hour. I had to add about ¼ - ½ a cup of flour in addition to this because it was too soft to roll.

While the dough is resting, boil the potatoes until soft. Peel and mash the potatoes (potatoes should be soft, without any lumps). Fry chopped mushroom in oil until they have released moisture. Mix the mushrooms with the mashed potatoes. Add salt and pepper to taste. Mix well.

To make the varenyky, roll out a portion of the dough to about 1/8 inch thickness (use flour for dusting). Cut ~2 inch diameter circles using a cookie cutter or inverted glass. The dough will stretch as you fill and seal the varenyky so don’t make them too big. Repeat until all the dough is used up.


Spoon about two teaspoons of filling in the center of each circle (this quantity might have to be adjusted a little depending on your dough consistency and size). Fold into a semicircle and seal the edges well by pressing them together firmly. At this point, the varenyky can be frozen if you are not cooking them right away. Place them on a plate without touching each other and leave in the freezer until hard. Then they can be transferred to an airtight container or a Ziploc bag.


Before cooking the varenyky, prepare the onion for topping by frying them in oil with the flour until golden brown.

To cook the varenyky, heat water in a medium/large pot. Add salt to the water. Bring the water to a rolling boil. With the heat still on high, carefully add the varenyky to the water. Cover and cook until they are fully cooked and rise to the surface (~3-5 minutes). Take the pot off the heat and remove the varenyky. Add the onions along with the leftover oil in the pan. Cover and shake the container until the onions + oil coat all the varenyky.

Serve warm garnished with chopped parsley or spring onions and a dollop of sour cream for extra deliciousness!


~Gayatri

Monday, May 26, 2014

Farmer’s pie (for the vegetarian shepherd)

Yum
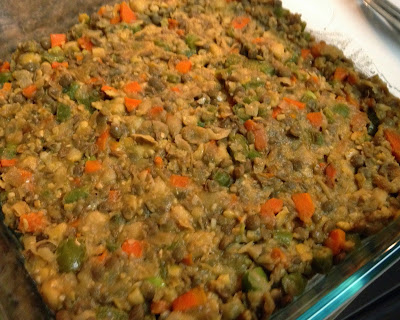
Typically a shepherd’s pie is a meat pie with a mashed potato topping. What would you call it then if it doesn’t have meat? Well, I called it “Farmer’s pie”, but creative name suggestions are welcome :-). Irrespective of the name, it makes a delicious and hearty meal coupled with a salad and maybe some bread. I used chickpeas as the base ingredient to pull everything together, but any kind of beans can be used. If you’re not particularly fond of beans or don’t need the extra protein in the pie, beans can be skipped and you could use more vegetables of any kind you like. The ingredients I used were what I had at home, but other vegetables (like broccoli, cauliflower, squash etc.) could be used as well. 

 
Ingredients:
1 medium onion - chopped (~3/4 cup chopped)
2 cloves of garlic
1-2 carrots – chopped
~¾ cup chopped green beans
1 small bell pepper – chopped
1 can of chickpeas (or ~1.5 cup cooked chickpeas)
½ cup of cooked red lentils (optional – I used this because I had some leftover)
1 Tbsp oil
Salt
Pepper
Paprika (optional)
Cumin powder (optional)
Vegetable stock/water (if required)

For the topping:
~4-5 red potatoes (or any other kind) - boiled
1 sweet potato (optional) - boiled
1 Tbsp butter
Milk
Salt

Heat oil over medium-high heat. Add onion, garlic and carrots and sauté until the onion is translucent. If using cumin powder, add that at this point. Add green beans, bell pepper and cook for a minute. Mix in chickpeas and lentils, salt, pepper and paprika (adjust to taste). Cover and cook for a few minutes until the chickpeas are soft. Use a fork or a potato masher, mash the mixture just a little, but make sure there is still a good texture to the filling for the pie. If the filling seems dry, add a little stock or water and let it heat through to make sure the mixture is moist. 

Mashed potato topping:
Mash the boiled potatoes separately. Divide the butter and add it to the potatoes. Add milk if required to mash them to a smooth texture. Season with salt.

Assembling and baking the pie:
Fill a casserole/baking dish (I used a 8x8 glass dish) with the pie filling, leveling it with the back of a spoon. Top it with the mashed potatoes. You can get creative here and make any design you would like. Piping the potatoes with a frosting tip is also a good option. I just spooned the potatoes over the filling alternating between regular and sweet potatoes, and then made a pattern on it with a fork. The patterns help make several edges on the mashed potatoes which crisp up in the oven.


If you’re not baking right after making the filling and the topping, let the pie heat through in the oven at 400 F for about 10 min. If the filling and topping is still hot, this step can be skipped since everything is already cooked. Broil on high until the top is browned a little. Serve warm.

~Gayatri

Wednesday, February 26, 2014

Adobo-don

Yum
It’s the Filipino Godfather of chicken dishes. Get it? Don…Godfather…

Actually, “don” in this case comes from the Japanese donburi, meaning “rice bowl dish,” and one of my husband’s standby’s when we go to our favorite Japanese restaurant is katsu-don (pork rice bowl). One of his other favorite meals is adobo (uh-doh-boh), a traditional Filipino dish made from pork or chicken stewed in a spiced vinegar-soy broth. One evening while making adobo, he proposed combining the two, so with the addition of some leeks and onions, Adobo-don was born!

Ingredients
12-16 boneless, skinless chicken thighs
1 bunch of leeks
1 bunch of green onions
1-2 small sweet onions
½ cup soy sayce
¾ cup vinegar
1½ cups water
Black pepper
Garlic powder
Canola oil
Rice (I prefer brown)
 
Making the adobo
Layer the bottom of a large pot with chicken. Dust with pepper and garlic. Add another layer of chicken, and again season with pepper and garlic. Repeat until all the chicken is in the pot. Combine the soy sauce, vinegar and water and add to the pot, making sure all the pieces of chicken are submerged. Bring to a boil, then reduce to med-lo and cook for about an hour.

Making the “don”
Prepare rice according to directions on the package.

While the rice and chicken are cooking, prepare the leeks. They can be especially dirty, so after rinsing the outside and shedding some of the outer layers (much like lettuce) I like to slice them length-wise in quarters so I can rinse between the inner layers as well. Chop off the root end and the super green top ends, keeping the white part and about 2-3 inches of green. Chop these remaining parts of the leeks into segments about 3 inches long. Rinse the green onions and similarly chop them into 3-inch segments, discarding the root end. Coarsely slice the sweet onions into strips approximately the same size as the leeks and green onions.

Sauté the leeks, onions, and green onions in about 3 tablespoons of canola oil until they are soft. Add a few ladles of the chicken broth (once the chicken is done cooking) to the vegetables for flavor, and season with additional garlic powder and a sprinkling of soy sauce as desired.

A chicken bowl you can’t refuse!
Now it’s time to assemble the bowls! Rice on the bottom, followed by some vegetables, then top with a few piece of chicken, adding some adobo broth for more flavor and moisture. Then enjoy the bowl of deliciousness!

~Karla

Friday, November 22, 2013

Cheesecake Bites with Chocolate Crust

Yum
A few months ago, we posted a recipe for cheesecake bites that Karla had made for a dessert exchange at work. Over the last couple years, we have experimented with both the crust and the filling, including a crushed nuts crust, a chocolate crust, and even a sweet potato + cream cheese filling for a delicious thanksgiving dessert. The chocolate crust cheesecake bites were made for a couple occasions recently, and there were several recipe requests, so here’s a variation on Karla’s original cheesecake bites recipe.


Original recipe: Cheesecake Bites

The filling is the same, but the graham crackers were replaced by chocolate graham crackers. We added an extra chocolate graham cracker sheet. The consistency of the crust mixture should be such that you can form a ball, so if it’s too oily, add some more crackers! (9 cracker sheets did the trick for us). Instead of a fruit topping, we used chopped nuts. Macademia nuts or hazelnuts taste good, but you could use other nuts too, or leave the nuts out altogether. We drizzled dark chocolate to pretty up the cheesecake bites.

~Gayatri

Thursday, September 26, 2013

Chocolatey-Banana Muffins

Yum
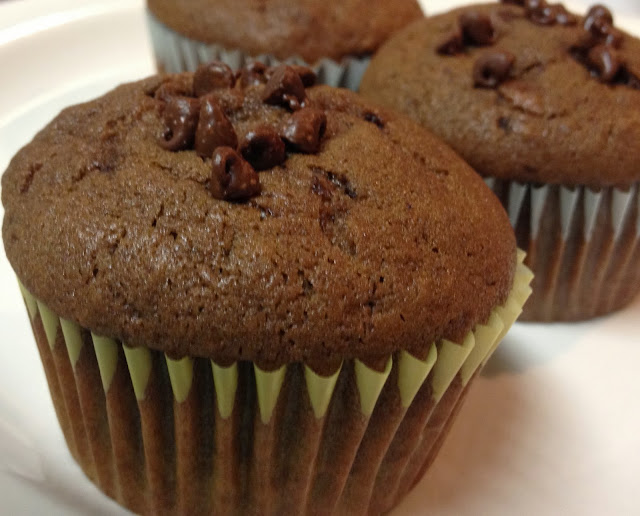
Every once in a while there is an overload of bananas in my kitchen :-). So far, banana nut bread has been my primary go-to recipe to use up ripe bananas. There are a few other things I like to make as well, including shira (Indian semolina pudding), banana pancakes, bread pudding, and good old shikran (a simple Maharashtrian dessert – sliced/mashed banana, milk, sugar, cardamom powder). But these typically don’t call for as much banana as the banana bread. So whenever I had more than one old banana to get through, I would always turn to the banana bread…. until last weekend. I realized that I was a little bored of the banana bread and wanted to try something slightly different, so I decided to add chocolate to it. But I didn’t quite know what else to change in the recipe to adjust for this addition, so I kind of just played with the ingredients till the batter tasted good and seemed to have good consistency… and it actually turned out pretty nice! This can be baked as a loaf, but I think it is better as muffins because of the light and moist texture.


Ingredients: (Makes approximately 18 regular sized muffins.)
1 cup sugar
2/3 cup butter
2 eggs
2 cups flour (all purpose/wheat)
3 tsp baking powder
1/2 tsp baking soda
a pinch of salt
2/3 cup buttermilk (See note below)
2 medium-sized ripe bananas (mashed well)
3/4 cup melted dark chocolate
chocolate chips (optional)
chopped walnuts (optional)

Heat oven to 340 F. Line muffin pan with liners or grease the pan.  Mix flour, baking powder, baking soda and salt in a small bowl (sift if necessary).

Beat the butter and sugar until light and fluffy. Add eggs and beat until combined. (Do not beat after this step. Use a spatula to mix ingredients). 
Add the flour mixture and buttermilk. Mix well with a spatula. Add the melted chocolate and bananas, and mix until combined. Add chocolate chips and walnuts and mix well.

Fill the muffin cups ¾ full and bake for ~22 min or until toothpick inserted in the center comes out clean. If you wish to sprinkle chocolate chips on top, sprinkle them about 15 min after putting the pan into the oven.

~Gayatri

Note: If you don’t have buttermilk, use 1 Tbsp. lemon juice/vinegar for every cup of milk. Mix them well and let stand for about 5 min.

Sunday, August 25, 2013

Strawberry-Rhubarb Bread

Yum
This one is a completely experimental recipe, but I got some good feedback from the folks who I tried this experiment on ;-)... so I figured I could post this! It’s a roasted rhubarb and strawberry bread, but any other fruit would also work, as long as it doesn’t release a lot of juice while baking. The reason I roasted the rhubarb with some sugar was to reduce the tartness, but this is optional. If you like the tart flavor of rhubarb, this step can be skipped. I plan to try using mango in this recipe while the stores still have good mangoes, and will update this post with the outcome of that… hopefully it will be just as delicious!
 

Ingredients:
1/2 cup unsalted butter / margarine
1 cup + ½ tbsp brown sugar
2 cups flour (I used 1 cup all purpose flour and 1 cup whole wheat flour)
1/2 tsp baking soda
1/2 tsp salt
1 cup buttermilk
1 tsp pure vanilla extract
1 egg
2 cups chopped fruit (rhubarb and/or strawberries)
¼ tsp ground nutmeg (optional)
¼ tsp ground cinnamon (optional)

Mix ½ tbsp. sugar with the chopped rhubarb, and broil for a ~3-4 min. This can also be done in a pan on the stovetop.

Preheat oven to 350 degrees. Grease a 9-by-13-inch baking dish or two loaf pans (I used three mini loaf pans and another small baking dish). Whisk together flour, baking soda, and salt.

Beat butter with ¾ cup sugar until light and fluffy. Add egg and beat. Fold in the flour mixture and buttermilk alternately. Add vanilla and mix. Stir in fruit.

Add batter to prepared pan. Mix nutmeg and cinnamon to ¼ cup brown sugar and sprinkle on top of the batter. Bake for ~35 min or until toothpick inserted in center comes out clean.

~Gayatri