Showing posts with label chicken. Show all posts

Monday, February 11, 2019

Chicken and Noodles

Yum
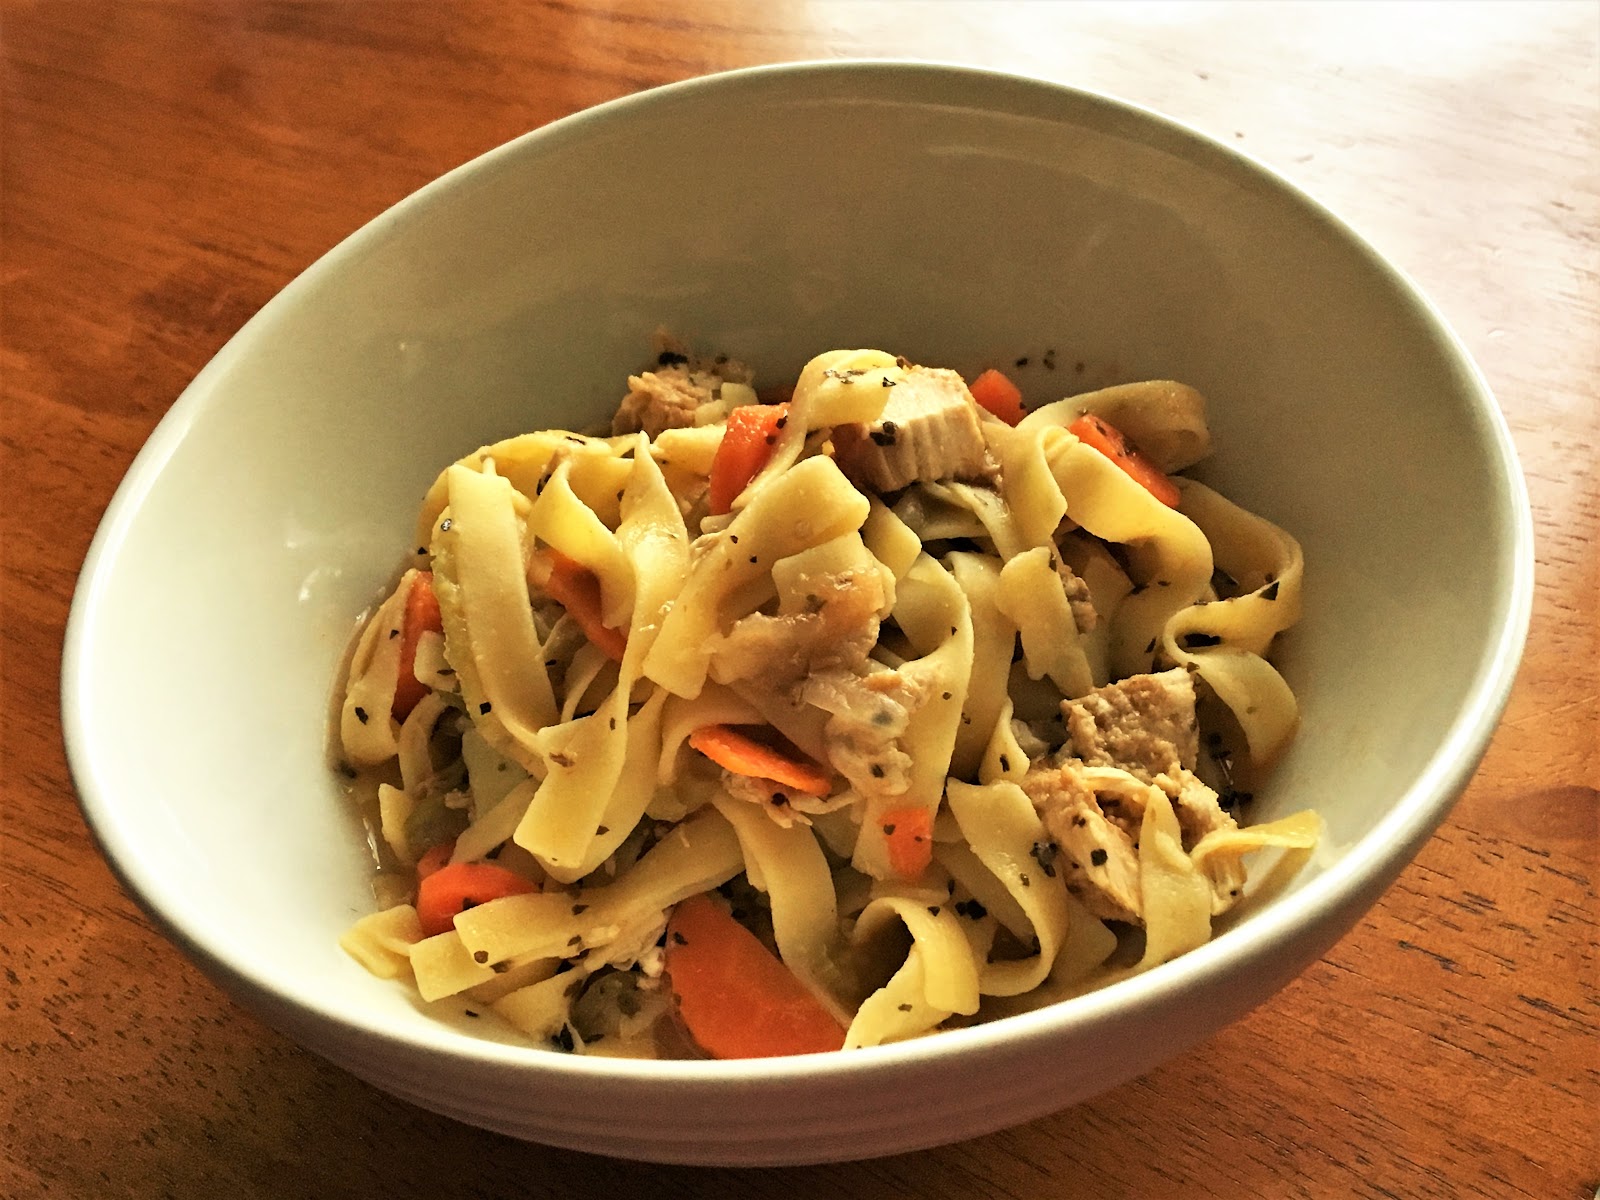
The recent yo-yo-ing weather patterns have made it a ripe season for the cold and flu viruses, and to combat them we need all the help we can get - vigilant hand-washing, zealous tissue use, and gobs of chicken noodle soup. It’s the perfect cold-weather comfort food, and paired with 7-Up is the quintessential cure-all for those pesky winter ailments!

I absolutely LOVE my mother-in-law’s homemade chicken noodle soup. The way she traditionally prepares it involves roasting a whole fresh chicken in a slow-cooker with chopped celery, carrots, and onion, which results in really tender meat and deliciously flavored veggies. Unfortunately, I usually don’t have the time (or patience!) to prepare it the “real” way, so I take a few shortcuts! Chopping the vegetables ahead of time (it’s always handy to keep a carrot-celery-onion mix at the ready!) and starting with a pre-cooked rotisserie-style chicken really cuts down on prep time for this classic dish.


Ingredients: (~6-8 servings)
~4 cups cooked chicken, shredded (I usually get a rotisserie chicken from the grocery store and peel all the meat off, discarding the skin and bones; however, chicken breast would also work - see this post for tips on cooking chicken breast)
1lb carrots, peeled and sliced
1 large onion, chopped
1 celery heart (~6-8 stalks), sliced
12-16oz egg noodles (I usually use the Amish-style ones for this dish)
4-5 cups low-sodium chicken broth
~1-2 TBSP chopped basil leaves (I used dried)
~1 TBSP oil
~1 TBSP ketchup (optional)
~1 TBSP lemon juice
Salt, pepper to taste


Heat the oil in a large pot. Sauté carrots, onion, and celery until soft, seasoning with salt and pepper to taste. Add the basil and lemon juice, and for a tangy kick, add ketchup.

While the vegetables are cooking, prepare the egg noodles according to the directions on the noodle package. I typically cook them just shy of al dente, since they will be added to the soup and will cook a little more in the broth.

Add the shredded chicken and egg noodles to the vegetables, then pour in the chicken broth and mix well (start with 4 cups broth, then add as needed for desired soup-iness).  Let simmer about 10 minutes. Ladle into bowls and dig in!


~ Karla


Find us on Facebook


Monday, July 18, 2016

Chicken Quesadillas

Yum
About once a week, my family eats at a Mexican place close to our home. We go there so frequently the waitstaff have become buddies with my son, giving him high fives and fist bumps, and tousling his hair as they pass by our table. We are recognized, which is nice...but can lead to some embarrassment. Since the restaurant is so close to us, we often walk there when the weather is nice, pushing the kids in strollers. On one such trip, we finished up a lovely meal, got our bill (which our son has begun to hold himself to take up to the counter to pay), and then started the affair of packing the kids back up in the strollers and making sure we didn’t leave anything behind. This can take upwards of fifteen minutes, especially if we discover a wet or dirty diaper in the process. So, there we are, frantically changing diapers and gathering various kiddie items as the restaurant fills with more patrons waiting for a table. We finally got both kids with clean diapers in their strollers and everything packed up, made sure nothing was left on the table, and, satisfied with another successful restaurant outing with two kids under 3 years of age, proceeded with a relaxing stroll back home. Whew!

Oh, wait…

“Did you pay the El Nopal bill?” my husband asked me the next day. “Nooo….” I replied, my voice trailing off. “...Did you?” Nope, he hadn’t either.

OOPS.

Yes. In our mad rush to clear out, we accidentally forgot to pay our bill. Later that day my husband went in to pay, and they had the bill taped to the wall behind the register. How mortifying! We weren’t sure if we’d ever be able to show our faces there again...which was so very unfortunate, because our favorite dish to share is their chicken quesadilla with guacamole. When we got to craving it again, the embarrassment was still too raw...we decided to just try to make it at home. Turns out, it was actually pretty easy to do! We even had the freedom to add more veggies to the quesadillas, and adjust the amount of cheese to our personal preferences. The bonus with making them at home is we could make burritos with the leftovers! WIN!


Ingredients: (6-8 quesadillas)
3 chicken breasts
1 medium onion
1 green bell pepper
~1 cup Mexican-style cheese blend (Monterey Jack, cheddar, asadero, queso quesadilla - can use all Monterey Jack or cheddar, or Colby Jack, instead of Mexican blend)
6-8 tortillas (I used flour tortillas, about 10” in diameter)
Chili seasoning (spice mix - not red chili powder)
Garlic powder (or fresh minced garlic)
Cumin powder
Salt, pepper to taste
A little oil for cooking


Cook and shred chicken breast per the instructions found here. Slice the onion and green pepper, and sauté in cooking oil over medium heat until the onions are translucent. If the chicken is cooked just before the onion and pepper, you can use the leftover drippings to cook the vegetables. Add the cooked chicken to the vegetables, and season with garlic, chili powder, cumin, salt and pepper to taste. Let simmer for 5-10 minutes.


Place a tortilla in a pan heated over med-lo heat. Sprinkle about 1 TBSP cheese on half the tortilla, spread about ¼ cup of the chicken-veggie mix over the cheese, and then top with more cheese. Fold the other half of the tortilla over, and let it sit for a few minutes until slightly browned and crispy, then gently flip and cook on the other side, until cheese is thoroughly melted.


For some extra crisp, grease the pan with a little bit of butter before assembling the tortilla in it. Serve with a scoop of fresh guacamole and garnish with cilantro.


~Karla

P.S. We’ve since been able to bolster our courage to dine at our favorite Mexican restaurant again, and we made absolutely sure we paid!

Find us on Facebook

Wednesday, July 6, 2016

Baked Chicken Mini-Empanadas

Yum
One of the fun things about cooking is figuring out what to do with various leftovers that at first glance don’t appear to go together at all. Being adventurous with how you mix all those seemingly unrelated ingredients can turn out delectable results...but just as often you might think Wow, I’ll never try that again! On a recent forage into my refrigerator, I happened across some leftover barbecue chicken, brown rice, cheese sticks, and pie crusts. What to do? Previously, I had made these siopao snacks with barbecue chicken, but I didn’t have any biscuits. The pie crust made me think of strudel, but the chicken would have barely filled one. However, the idea of stuffed pie crust led me to think of a childhood favorite - the pasty, pronounced PASS-tee. A hearty filling surrounded by a pastry crust - yum! Then I thought, why not make miniature versions? And then I thought Ooh, maybe I’ll call it an empanada...sounds fancier! The two dishes could actually be considered cousins, as they both are essentially dough or pastry stuffed with a variety of meat, cheese, vegetables, etc., with pasties originating from Cornwall, England, and empanadas originating from Portugal and Spain. Pasties are baked, while empanadas can be baked or fried. Bolstering my resolve to consider these treats as empanadas is the fact that pasties typically contain vegetables - which I did not have. So, “empanada” it was!


Ingredients: (makes ~18 empanadas)


~½ cup cooked rice
~¼ cup shredded cheese (I had a Colby-Jack cheese stick, which turned out to be about ¼ cup after it was chopped up to small pieces)
2 9” pie crusts
1 egg


Heat oven to 350°F.

Mix chicken, rice, and cheese together. Roll out pie crusts, and cut them each into thirds both vertically and horizontally.

fill_and_cut.jpg

In a small bowl, whisk the egg. Brush egg along the edges of each piece of pie crust to help seal the empanadas. Place ~1 TBSP of the chicken mixture on each piece, then fold the dough over diagonally and pinch the sides together. Use fork tines to crimp and seal.

crimp.jpg

Place on a parchment  lined baking sheet and brush tops with egg.


Bake ~20 min until golden brown. Let cool before munching...you might have a hard time stopping with just one!


~Karla


Find us on Facebook


Thursday, May 5, 2016

Chicken and Spinach Enchiladas

Yum
Happy Cinco de Mayo! Not to be confused with Mexico’s Independence Day (which is in September), Cinco de Mayo (literally “Five of May”) celebrates the Mexican army’s unexpected and unlikely defeat of French forces at the Battle of Puebla on May 5, 1862. My husband and I will probably head to the Mexican restaurant near our house, which we frequent almost once a week, usually splitting a giant quesadilla or burrito - or just gorging in their delicious house guacamole, chips, and salsa! In honor of Cinco de Mayo, here’s a recipe for homemade chicken and spinach enchiladas!

IMG_5793_mod.JPG


Ingredients:

~1½ cups cooked, shredded chicken breast
~10oz chopped spinach (I used frozen, thawed and drained)
~¼ cup chopped onion
2-3 cloves minced garlic
Ground pepper, salt to taste
2 cups shredded Cheddar Jack cheese (or Colby Jack, or any Mexican-style blend)
~10 corn or flour tortillas (enchiladas traditionally call for corn tortillas, but I used flour tortillas)
 
For the sauce:
¼ cup canola oil
2 TBSP flour
Scant ¼ cup chili powder (the seasoning, not ground red chili)
1 8-oz can no salt added tomato sauce
~1½ cup water
Garlic powder
Ground cumin


To make the sauce:
In a saucepan over medium heat, brown the flour in oil. Add chili powder and toast for a couple minutes. Add water and tomato sauce and stir well. Season with garlic powder and cumin to taste.
 
To make the filling:
Saute spinach and onion in a pan over medium heat (you can use a little cooking oil if you like, but it is not necessary). Add chicken and season with garlic and pepper to taste.
Assembling & Baking:
Preheat oven to 375°F. Reserve 1 cup of shredded Cheddar Jack cheese.
 
IMG_5763_mod.jpg
 
Lay a tortilla flat and put about ½ cup of chicken-spinach mixture toward one side of the tortilla. Sprinkle a bit of the cheese (about ½ - 1 TBSP) over the filling, then roll up tightly and place in a baking dish lined with Aluminum foil. Repeat until all the filling is used up (I was able to use 10 tortillas).

IMG_5767_mod.jpg

Spoon enchilada sauce over the top and spread to cover everything evenly. Sprinkle the remaining cup of cheese on top.

sauce_cheese.jpg


Bake at 375°F for 15-20 minutes until cheese is completely melted and a little crispy at the edges. Enjoy!

~Karla
 

IMG_5786.JPG
 
 
Find us on Facebook


Sunday, May 1, 2016

Stuffed Chicken Breast

Yum
Over the years, I’ve seen many, many pictures of delicious meals such as chicken cordon bleu, braciola (Italian stuffed beef), and several varieties of stuffed pork tenderloin. The pictures always made my mouth water, and most recipes seemed fairly straightforward, save one thing: my lack of a meat mallet. Marriage to the rescue! When my husband and I got married, a meat tenderizer was among our presents. Three plus years later, I finally used it while making a simple baked stuffed chicken dish! I used ingredients I already had on hand and topped the chicken off with a simple breadcrumb mix for a nice crispy accent.

DSC_5366_color.jpg

Ingredients:
4 boneless, skinless chicken breasts
~1 cup shredded mozzarella cheese
~1 cup feta cheese
~1½ - 2 cups fresh spinach
2-3 cloves garlic, minced

For breadcrumb topping
~¼ cup grated parmesan cheese
~¼ cup panko breadcrumbs
1 tsp garlic powder
dash of ground pepper, thyme, marjoram


Preheat oven to 350°F.

To make the filling: Place cheese, spinach, and minced garlic in bowl. Microwave on high for 1 - 1½ minutes in ~30sec bursts to wilt spinach and soften cheese, stirring in between.

DSC_5252.JPG
DSC_5317_color.jpg

To make the breading: Combine parmesan cheese and breadcrumbs. Season with garlic powder, thyme, marjoram, and ground pepper.

Assembly: Butterfly chicken breasts and use the flat side of a meat mallet to tenderize/thin the chicken to about ½ inch thick. Spread filling on one side, roll up and secure ends closed with toothpicks, and place on a baking sheet.

steps.jpg

Finishing: Sprinkle the tops of the chicken rolls with breading mixture. Bake at 350°F for 45 minutes.

Remove the toothpicks, slice and enjoy!

DSC_5342_color.jpg

~Karla

Find us on Facebook

Sunday, April 24, 2016

Baked Spinach Artichoke Chicken Dip

Yum
One of my husband’s favorite appetizers is spinach artichoke dip - two healthy greens turned into somewhat of an indulgence with warm, gooey, garlicky melty cheese. Sometimes, if we are not particularly hungry, we’ll split an order of spinach artichoke dip for a meal, and we always run out of dip before we’ve used up the chips that come with it! I had never really thought about trying to make my own spinach artichoke dip. While I usually have frozen spinach on standby in the freezer, artichoke almost never makes it to my weekly shopping list. I had tried using fresh artichoke once before, many years ago, and it was pretty disastrous. Recently, however, I started experimenting with soufflés and have regularly gotten canned artichokes - much easier to work with! With both spinach and artichoke on hand, I decided it was time to give this favorite appetizer a try. For additional substance, I tossed in some shredded chicken breast to make it a little more meal-worthy.

IMG_5738.JPG

Ingredients:
1 can artichoke hearts (about 8-10 hearts), coarsely chopped
~10oz chopped spinach (I used frozen, thawed & drained)
~1.5 cups chicken breast, cooked and shredded
8oz cream cheese (I used reduced fat)
~6oz plain Greek yogurt (I used fat-free)
~½ cup shredded Parmesan cheese
~1 cup shredded Mozzarella cheese
3-4 garlic cloves, minced

IMG_5711_crop.jpg

Heat oven to 375°F.

In a large bowl, combine all ingredients. Mix until cream cheese and yogurt are incorporated, but no need to make it a homogenous mixture - pockets of melty cheese are wonderful when eating!

 IMG_5713.JPG

Transfer the mixture to a baking dish and bake for 20-25 minutes, until the cheese at the edges begins to brown. Allow sufficient cooling time to prevent burned tongues, top with more parmesan, then dig in with crackers or chips!

 IMG_5724.JPG

~Karla

Find us on Facebook